DIYRE
73P Class-A Mic Preamp
$400.00
- Full Kit
- Step-by-Step Guide
- Supported
- $50 Repair Policy
- Intermediate
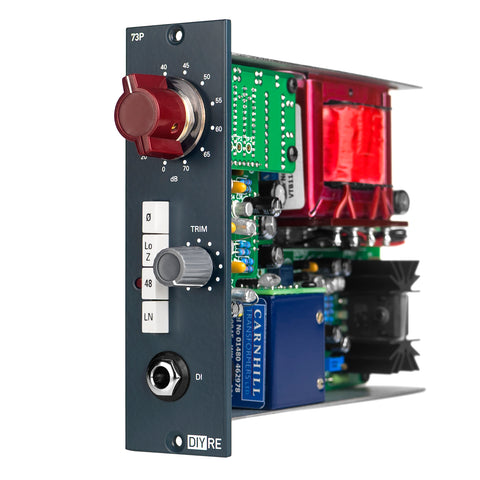
The 73P is an authentic, complete adaptation of the vintage 1073®* mic preamp circuitry to the 500-series format. The 73P is authentic in that it uses only components that are hand-selected to match the original, and there are no changes to any of the preamp circuitry. The 73P is complete in that it adheres to the original, three-stage amplifier design.
The 73P is an intermediate DIY kit. To successfully build it, you should have some experience identifying basic components such as resistors and capacitors and soldering on circuit boards. We don't recommend the 73P as your first DIY project ever—check out our beginner kits first. Check the Required Tools list below to make sure you have everything you need to build the 73P before ordering.

The definitive kit
Our guiding principle in designing the 73P was to get everything right. Every choice, from the use of Carnhill transformers to the hue of the front panel, was carefully considered and tested against the original. The 73P even features a unique power regulator circuit designed to replicate the imperfections of the original console power supply.

Know your tools
Our assembly guide makes building the 73P as simple as possible (but no simpler). The 73P is intended for intermediate DIYers who are driven to learn more about how analog audio gear works. The assembly guide is broken down into circuit blocks. Each block features an explanation of how it works and contributes to the sound of the preamp.
Full feature list
- Three-stage mic preamp based on the 1290 preamp, the same found in the 1073® preamp and EQ
- Grayhill 12-position gain switch
- LINE mode turns the preamp into a line-level processor for adding warmth and depth in mixing
- LO Z switch for switching input impedance between 1.2k (standard) and 300 ohms.
- TRIM knob allows for driving the preamp hard without clipping the next device
- Polystyrene and tantalum capacitors in the signal path, as used in the original
- Carnhill input and output transformers
- Front panel DI input. When an instrument is plugged in the mic/line input is automatically disabled
- On-board regulator sets the power voltage to +24 like the original
- Fully compatible with the 500-series format
DIY kit
- Comes with every part needed to complete kit
- Features step-by-step photo instructions, interactive build map, and component sorting sheet
- PCB is divided into circuit blocks, with corresponding explanations of each block in the assembly guide
Required Tools
- Soldering iron. We recommend an adjustable-temperature station. The smaller, pencil-style ones that plug directly into the wall do not have enough power to create good joints consistently.
- Solder. You can use 60/40 leaded solder or lead-free. We recommend 60/40 because it is easier and more forgiving to use.
- Wire cutters. A good pair will be sharp and have a fine point for cutting leads down right at the solder joint. Don't use a set of large cutters meant for household wiring.
- Phillips head screwdriver
- 500EXT 500-Series Cable Extender or a horizontal 500-series rack with a removable lid. Testing and calibrating the 73P requires accessing the circuit board while it is plugged into the rack. This is almost impossible to do in a vertical 500-series rack without an extender like the 500EXT.
*The 73P is not designed or manufactured by AMS Neve Limited, owner of the trademarks Neve®, 1073®, and Marinair®.
Picking a Circuit
Our intention with this project was to recreate the mic preamp from the 1073 preamp/EQ module as authentically as possible. (Neve® actually had their own module with just the mic preamp called the 1290. But since 1073 is the model most people are familiar with, we’ll call it that.) In surveying the current field of 1073-esque preamps, we noticed two distinct approaches; we’ll call these the “three-stage” and “two-stage” designs.
The original 1073 (and 1290) used three stages. This approach uses two high-gain preamp stages (yes, I know it’s confusing for a preamp to contain preamps, but that’s what they’re called), and one low-gain output stage. Neve split the gain between stages this way to keep distortion consistently low at all gain settings.
The two-stage approach has only one preamp stage, followed by the output stage. This is based on yet another Neve module, the 1272 line amplifier. Around the 90’s people started racking these modules and adding gain switches to convert them into mic preamps. Since then, several companies have made two-stage preamps, often named after the 1073 even though they are closer to the 1272. These can still sound great, and some are highly regarded.
The two-stage approach is appealing because it reduces cost and complexity. This is especially true for a 500-series module and DIY kit. However, after researching the circuit and evaluating a vintage 1272, we decided against it. In addition to being more faithful to the 1073, the three-stage design allows for more gain and better performance.

The preamplifier circuit, of which there are two in the 1073 and one in the 1272.
This is clear if we look at the original modules. The 1073 provided up to 80dB of gain, the 1272 only 50dB. From 0-50dB the preamps are identical, but from 55-80dB, the 1073 engages the third amplifier stage. Modern, two-stage preamps achieve more than 50dB by increasing the gain of each stage. This pushes the amplifiers beyond what they were asked to do in the original designs. This isn’t necessarily a bad thing, but it’s not how Neve designed their mic preamps. It’s telling that Neve never used the 1272 as a mic preamp, and instead went to the expense of the third stage. For this reason we decided that the three-stage design was the clear choice.
Adapting to 500-Series
The first challenge was how to fit the 1290’s many parts, including two big transformers and one giant transistor and heatsink. However, this was a straightforward problem that just required some grunt work. We also aimed to replicate the grounding scheme of the original. Neve managed ground currents carefully between amplifier stages to keep noise low. We recreated this on the 500-series module by giving each stage its own ground pour, which is tied to the others via a bus wire which runs along the bottom of the module back to the card-edge connector.

Our most recent prototype, with everything fitting in a single 500-series slot. We have at least one more round of prototyping to go, with an improved layout and the TIP3055 transistor.
The more complex problem was how to handle the power supply. The 80-series consoles ran on a unipolar 25v power supply. The 500-series on the other hand uses a bipolar +/-16v supply. Therefore, some form of conversion needs to happen to power the 1290 correctly from the 500-series rack.
We considered several options. First, we looked into adjusting the 1290 circuit to run on +/-16v. A bipolar +/-16v supply can also be used as a unipolar 32v supply by treating -16v as ground. In this scheme, some resistor values would just have to be adjusted to make the transistors bias correctly. This has the benefit that no regulation or DC-DC conversion is required, and some high-end 1290-style preamps have used this approach. However, we quickly realized that scaling the bias resistors would also require scaling gain setting and feedback resistors, which would in turn require scaling capacitors, and so on until the circuit barely resembled the original.
The next approach was to regulate both power rails down from +/-16v to +/-12v, thereby creating 24v between the two rails. This is the most common route taken by existing clones. It has the drawback of requiring two regulators or an integrated DC-DC converter, but it does not require any changes to the 1290 circuit.
We were set on this path when we realized that we could also achieve 24v with a single regulator, by using -16v as ground and regulating +16v down to +8v. This freed up some precious PCB space and eliminated a potential failure point. So we decided on this scheme, but with an important twist: we “deregulated” the +8v rail to get even closer to the original.
The Sound of the Power Supply
An overlooked aspect of the original console is the design and performance of the power supply. Nothing in analog audio is truly “outside the signal path.” Everything in a piece of gear from the chassis to the power supply affects the sound. The power supply affects audio in two ways: by being quiet or noisy, and by being “stiff” or “saggy.” The first is straightforward—we want to keep noise as low as possible. The second describes the supply’s ability to deliver current while keeping the voltage stable. A “stiff” power supply never drops below its rated voltage. A “saggy” power supply will momentarily drop below the rated voltage when faced with a big spike in the demand for current. These spikes come from especially loud, low-end-heavy sources and increase with gain and level. The sag creates distortion and compression which are part of the sound of the preamp.
Modern regulator chips and DC-DC converters are invariably as stiff as possible. So in order to recreate the sag of the 80-series power supply, we simply used the same regulator technology Neve used. Our +24v rail is generated utilizing a zener shunt regulator with a large pass transistor. Think of it this way: if you had a vintage 80-series console, would you replace the power supply with a modern one?
Selecting Parts
Transformers were the most straightforward component to choose. Carnhill transformers are the de facto standard for anything vintage Neve. The blue input and red output transformers have even become visually iconic in their own right. We tested some options from OEP, Sowter, and Ed Anderson, but found no reason to deviate from the Carnhills.

All of the transistors we auditioned for the 73P.
Transistors do the work of amplifying the signal. The 1290 card uses two types: eight small-signal transistors, and one power transistor to drive the output transformer.
Our process for choosing them was to compare several currently-available options to a vintage set taken from an 80-series console. These were BC109C for the small-signal, and a Newmarket 2N3055 for the output.
Our takeaway was that transistors are important to the sound, but only when they are saturating. That is, when the preamp was delivering a clean signal with no noticeable saturation, we heard little-to-no difference between the transistors. But once they started to clip, audible differences did emerge.
However, even in saturation the differences are not night-and-day. We’re talking about the kind of differences that can only be positively identified with good monitoring and careful flipping back and forth between samples. This is confirmed by Neve’s own approach. When they were making the 80-series consoles, Neve used various small-signal transistors, including the BC107C, BC109C, BC184L, BC184C, BC114 and various brands of 2N3055. Additionally, manufacturing tolerances were much looser in those days, so batches of the same transistor might be as different as one transistor was to another. The takeaway, however, is not that every 80-series module sounded significantly different. Rather, it’s that the circuit is designed to be highly forgiving so that almost any transistor can drop in and sound basically right.
Many of the transistors Neve used are still in production, including the BC107/BC109, BC184, and 2N3055. However, manufacturing processes have changed so much since then that there’s no guarantee that these would sound anything like their vintage counterparts. So we also tested several other transistors that have been used in this circuit, including the BC550, BC548, 2N4401, MPSA06, MPSA18 for small-signal and the TIP3055 for output. We spent several days exclusively listening to transistors on various samples and at various gain levels deciding on the BC109C and TIP3055.
Capacitors often get a bad rap as something to avoid in audio circuits (have you ever seen “capacitorless signal path” in ad copy?), but they are key to the sound of this circuit. The 1290 uses three types: polystyrene, tantalum, and aluminum electrolytic.
We know from our listening tests for previous designs that polystyrenes and tantalums have their own sounds which cannot be achieved with more modern options. As such, we didn’t consider replacing them.
Electrolytic capacitors required a deeper dive. In our experience, different manufacturers, series, and even voltage ratings of the same value electrolytic capacitor can sound different. So we wanted to make sure to do our due diligence on this front.
The main difficulty lay in finding a gold standard to measure against. Electrolytic capacitors have a shorter shelf life than polystyrene and tantalum, so any that could be pulled out of an 80-series console would have long gone bad or at least changed their performance too much to be a gold standard. Additionally, any consoles still in use have been recapped (had the electrolytic capacitors replaced) several times. This further complicates the search for a gold standard. That is, should the reference point the caps that “Rumours” passed through in 1977 or the ones that recorded “Nevermind” in 1991?
So the best we could do is to trust the techs who have been recapping these consoles for years. They generally recommend the BC 031 series for both sound and form-factor. So we compared a set of 031s against our favorite Panasonic FR series on the same BA283 card. The result was that we found the FR series to be practically indistinguishable from the 031. Based on this, we opted for the FR series as the radial (vertical) mounting style fits better in the 500-series space constraints.
| Mic Input Impedance | 1.2kΩ with Lo Z out, 300Ω with Lo Z in |
| Gain | 0-70dB |
| LN Impedance | 4.7kΩ |
| LN Attenuation | 25dB |
| DI Impedance | 1MΩ |
| DI Attenuation | 35dB |
| THD+N @ 20dB gain* | 0.0032% |
| THD+N @ 40dB gain* | 0.014% |
| THD+N @ 60dB gain* | 0.14% |
| EIN (Equivalent Input Noise) | -128dBA |
| Trim Range | -80dB to 0dB |
| Frequency Response | ±0.2dB 20Hz to 20kHz rel. 1kHz |
| Power Supply | ±16vDC, +48vDC |
| Maximum Current Draw | 120mA |
*+20dBu output, 1kHz, 20-20kHz bandwidth


